How to Find the Right PCB Assembly Factory in China: A Complete Guide
Searching for a PCB assembly factory in China can feel overwhelming. Thousands of factories in Shenzhen alone. Each one claiming to
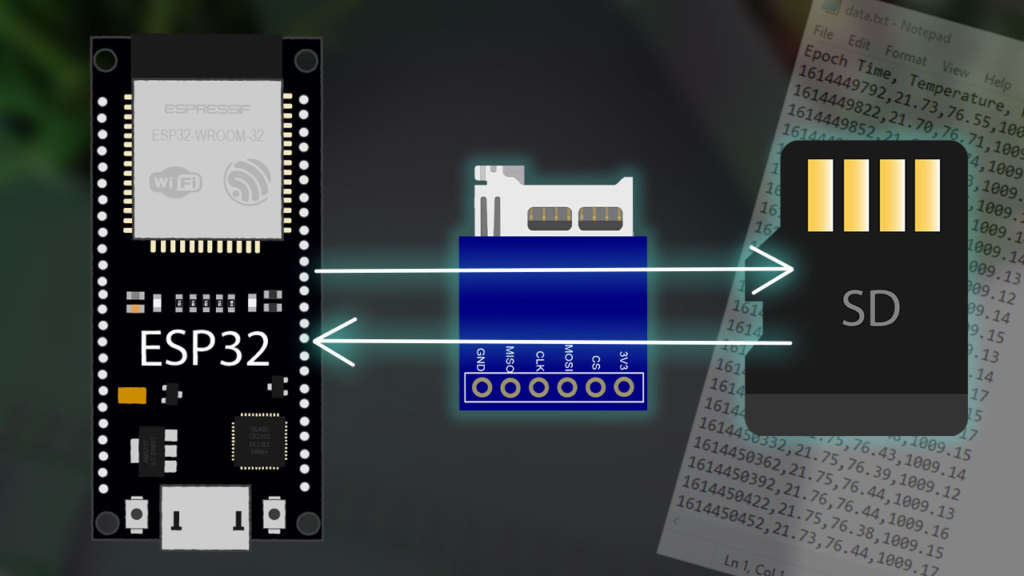
The ESP32 is a powerful microcontroller, but its internal memory is limited. Adding a microSD card is a transformative upgrade that enables advanced applications like extensive data logging, serving large files for web servers, or storing multimedia. This comprehensive tutorial demonstrates how to reliably connect, configure, and program a microSD card module with the ESP32 using the Arduino IDE.
Building on foundational knowledge, this guide provides practical, tested instructions and expert insights to help both beginners and experienced developers implement robust external storage solutions.
Most microSD card modules for microcontrollers use the SPI (Serial Peripheral Interface) protocol for its simplicity and broad compatibility. The module shown in this guide is a common SPI-based model that works seamlessly with the ESP32, Arduino boards, and ESP8266.
Expert Tip: While the SPI protocol is widely used, the ESP32 also supports a faster SDMMC (SD/SDIO/MMC) hardware protocol via its dedicated SD/SDIO/MMC controller. This requires different wiring (using the ESP32‘s GPIOs 6, 7, 8, 9, 10, 11) and the
SD_MMC.hlibrary. For most projects, the SPI method offers the best balance of simplicity and sufficient speed.
To follow this guide, you will need:
An ESP32 development board (e.g., DOIT ESP32 DevKit V1, NodeMCU-32S).
A microSD card module (SPI).
A microSD card (formatted as FAT32).
Jumper wires and a breadboard.
The connection between the module and the ESP32 uses the default VSPI pins of the ESP32.
| MicroSD Card Module Pin | ESP32 GPIO Pin |
|---|---|
| 3V3 (VCC) | 3.3V |
| CS (Chip Select) | GPIO 5 |
| MOSI (Master Out Slave In) | GPIO 23 |
| CLK (SCK Clock) | GPIO 18 |
| MISO (Master In Slave Out) | GPIO 19 |
| GND | GND |
Crucial Connection Advice: Always use the 3.3V pin on the ESP32 to power the module. Applying 5V will likely damage both the module and your ESP32. Ensure your microSD card is formatted as FAT32 (not exFAT or NTFS) for compatibility with the Arduino SD library.
Ensure your Arduino IDE is set up for the ESP32. You can install the ESP32 board support via the Boards Manager. The necessary libraries (FS.h, SD.h, SPI.h) are included in the ESP32 Arduino core by default—no separate installation is needed.
The following code, adapted from the SD_Test example in the Arduino IDE, provides a complete toolkit for handling files. It is thoroughly commented to explain both the “how” and the “why.”
/*
 * Complete ESP32 microSD Card File Operations Example
 * Based on the SD_Test example from the ESP32 Arduino Core
 * Includes detailed explanations for each function.
 */

#include "FS.h"
#include "SD.h"
#include "SPI.h"

void listDir(fs::FS &fs, const char * dirname, uint8_t levels) {
  Serial.printf("Listing directory: %s\n", dirname);
  File root = fs.open(dirname);
  if(!root){
    Serial.println("Failed to open directory");
    return;
  }
  if(!root.isDirectory()){
    Serial.println("Not a directory");
    return;
  }
  File file = root.openNextFile();
  while(file){
    if(file.isDirectory()){
      Serial.print("  DIR : ");
      Serial.println(file.name());
      if(levels){
        listDir(fs, file.name(), levels -1); // Recursive call for subdirectories
      }
    } else {
      Serial.print("  FILE: ");
      Serial.print(file.name());
      Serial.print("  SIZE: ");
      Serial.println(file.size());
    }
    file = root.openNextFile();
  }
}

void createDir(fs::FS &fs, const char * path) {
  Serial.printf("Creating Dir: %s\n", path);
  if(fs.mkdir(path)){
    Serial.println("Dir created");
  } else {
    Serial.println("mkdir failed");
  }
}

void readFile(fs::FS &fs, const char * path) {
  Serial.printf("Reading file: %s\n", path);
  File file = fs.open(path);
  if(!file){
    Serial.println("Failed to open file for reading");
    return;
  }
  Serial.print("Read from file: ");
  while(file.available()){
    Serial.write(file.read()); // Read and output byte by byte
  }
  Serial.println(); // New line for cleaner output
  file.close();
}

void writeFile(fs::FS &fs, const char * path, const char * message) {
  Serial.printf("Writing file: %s\n", path);
  File file = fs.open(path, FILE_WRITE);
  if(!file){
    Serial.println("Failed to open file for writing");
    return;
  }
  if(file.print(message)){
    Serial.println("File written");
  } else {
    Serial.println("Write failed");
  }
  file.close();
}

void appendFile(fs::FS &fs, const char * path, const char * message) {
  Serial.printf("Appending to file: %s\n", path);
  // FILE_APPEND mode ensures existing content is preserved
  File file = fs.open(path, FILE_APPEND);
  if(!file){
    Serial.println("Failed to open file for appending");
    return;
  }
  if(file.print(message)){
    Serial.println("Message appended");
  } else {
    Serial.println("Append failed");
  }
  file.close();
}

void setup() {
  Serial.begin(115200);
  delay(1000); // Short delay for stability

  // Initialize SD card with the CS pin connected to GPIO 5
  if(!SD.begin(5)){
    Serial.println("Card Mount Failed. Check: Wiring, CS pin, Card Format (FAT32).");
    return; // Stop setup if initialization fails
  }

  // Identify the type of SD card inserted
  uint8_t cardType = SD.cardType();
  if(cardType == CARD_NONE){
    Serial.println("No SD card attached");
    return;
  }
  Serial.print("SD Card Type: ");
  if(cardType == CARD_MMC) Serial.println("MMC");
  else if(cardType == CARD_SD) Serial.println("SDSC");
  else if(cardType == CARD_SDHC) Serial.println("SDHC");
  else Serial.println("UNKNOWN");

  // Display card size information
  uint64_t cardSize = SD.cardSize() / (1024 * 1024);
  uint64_t usedSpace = SD.usedBytes() / (1024 * 1024);
  Serial.printf("SD Card Size: %lluMB\n", cardSize);
  Serial.printf("Used space: %lluMB\n", usedSpace);
  Serial.printf("Free space: %lluMB\n", cardSize - usedSpace);

  // --- Execute File Operations ---
  listDir(SD, "/", 0); // List root directory
  createDir(SD, "/mydir");
  writeFile(SD, "/mydir/hello.txt", "Hello from the ESP32!\n");
  appendFile(SD, "/mydir/hello.txt", "This is an appended line.");
  readFile(SD, "/mydir/hello.txt");
  Serial.println("All demo operations completed.");
}

void loop() {
  // Can be used for ongoing data logging tasks
  // Example: appendFile(SD, "/data.log", "Sensor reading: ...\n");
  // delay(5000);
}
After wiring your hardware:
Insert a formatted FAT32 microSD card into the module.
Upload the code to your ESP32.
Open the Serial Monitor (115200 baud).
You should see the card information print, followed by a demonstration of directory creation, writing, appending, and reading.
Moving beyond basic examples, here are practical ways to use microSD storage:
Sensor Data Logging: Create a timestamped CSV file to save temperature, humidity, or motion sensor readings over days or weeks. Use the appendFile function in the loop() to add new rows.
Web Server Asset Storage: Store HTML, CSS, JavaScript, and image files on the SD card to create a rich, standalone web server interface for your ESP32.
Firmware Updates or Configuration Files: Store updated firmware binaries or device configuration (JSON files) on the card, allowing the ESP32 to read and apply settings without reflashing.
Even with correct wiring, issues can arise. Here are solutions based on common pitfalls:
| Symptom | Likely Cause & Solution |
|---|---|
| “Card Mount Failed” | • Wiring: Double-check MISO, MOSI, SCK, and CS connections. • Power: Ensure you’re using the ESP32’s 3.3V pin. • Card Format: Reformat the card as FAT32. |
| “No SD card attached” | • The module cannot detect the card. Reseat the microSD card. • Try a different, known-good microSD card (some brands/models have compatibility issues). |
| File Write/Read Fails | • Ensure the file path is correct (case-sensitive). • The card might be write-protected (check the physical lock switch on full-size adapters). |
| Random Resets or Crashes | • The SD card draws significant current during writes. Add a 100-470µF electrolytic capacitor between the module’s VCC and GND pins to stabilize power. |
Integrating a microSD card with your ESP32 via SPI is a straightforward process that dramatically expands your project’s capabilities for data-intensive tasks. By following the wiring, formatting, and code guidelines above, you have a solid foundation.
To deepen your knowledge, explore the official ESP32 SD/SDIO/MMC Driver documentation from Espressif for low-level details. Experiment with the SD_MMC library for potential performance gains if your hardware supports it.
This guide is designed not just to make your project work, but to help you understand the underlying principles for reliable and effective data storage solutions with the ESP32.
======================================
No account yet?
Create an Account