Custom Display Manufacturing in China: A Complete Guide to Sourcing Screens
Whether you are developing an IoT device, a medical instrument, or consumer electronics, the display is often the most critical
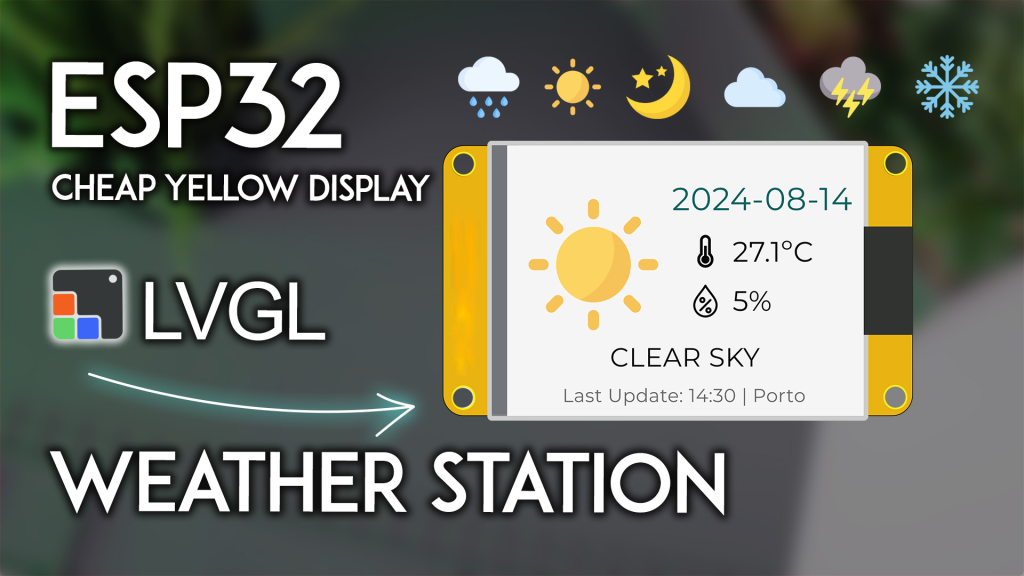
Are you looking for your next weekend electronics project that is both functional and visually impressive? Imagine building your own smart weather station that displays live local data on a vibrant, colorful touchscreen. It’s easier than you think, and it costs a fraction of a commercial device.
In this comprehensive guide, we’ll show you exactly how to transform the popular ESP32 Cheap Yellow Display (CYD) into a fully-functional weather station using the powerful LVGL graphics library. By the end, you’ll have a sleek, desk-ready gadget that shows temperature, humidity, weather conditions, and the current date—all updated automatically from the internet.
Whether you’re a seasoned maker or an enthusiastic beginner, this project is the perfect way to level up your ESP32 skills and create something truly useful.
Before we dive into the wiring and code, let’s look at why building your own is a superior choice. Off-the-shelf weather stations can be expensive, have small, hard-to-read screens, or lock you into proprietary apps and cloud services.
Building your own with the ESP32 CYD offers incredible benefits:
Full Customization: You control the data source, the screen layout, and the update frequency. Want to add air pressure or wind speed later? You can.
Cost-Effectiveness: The entire project is built around the incredibly affordable ESP32-2432S028R board, often found for under $15.
No Recurring Costs: We use the free and reliable Open-Meteo API, so you don’t need a subscription.
A Powerful Learning Experience: You’ll gain hands-on experience with the ESP32, Wi-Fi connectivity, JSON data parsing, and professional GUI creation with LVGL.
This isn’t just following instructions; it’s about understanding the components to build something uniquely yours.
In this project, your ESP32 CYD will transform into a dedicated weather information center. The 2.8-inch TFT touchscreen will display:
Current Weather Description: “Clear Sky,” “Partly Cloudy,” “Rain,” etc.
Temperature: In Celsius or Fahrenheit.
Relative Humidity:
Current Date:
Last Updated Time:
Intuitive Weather Icons: A custom image (sun, cloud, rain, snow, etc.) visually represents the conditions, making the display easy to read at a glance.
The data is fetched from the Open-Meteo API, a free service that requires no API key, making this project incredibly straightforward to set up.
[Image: A clear photo of the completed ESP32 CYD weather station displaying data, e.g., showing 24°C, 65% humidity, and a sun icon]
To get started, you’ll need just a few key components. We’ve vetted these to ensure compatibility and quality.
The Brain & Display: ESP32-2432S028R (The “Cheap Yellow Display” or CYD)
This is the heart of your project. This all-in-one board combines an ESP32-WROOM-32 module with a 2.8-inch TFT touchscreen, making it ideal for IoT projects with a GUI.
A USB Cable: A standard Micro-USB data cable to power and program the board.
A Computer: With the Arduino IDE installed and ready to go.
That’s it! The board includes all the necessary circuitry, an RGB LED, and a microSD card slot for future expansion.
Follow these steps carefully. We’ve structured this guide to ensure success, even on your first try.
Phase 1: Prerequisites & Setup (Trust the Foundation)
Skipping these steps is the number one reason projects fail. We’ve done the hard work of configuration so you don’t have to.
Install ESP32 Boards in Arduino IDE: If you haven’t already, you need to add the ESP32 board package to your Arduino IDE. This tells the software how to talk to your chip.
Get to Know Your CYD: This board is incredibly popular for a reason. Familiarize yourself with its pinout and features to avoid confusion later.
Install the Core Libraries (The Secret Sauce): This project relies on two critical libraries configured in a very specific way.
LVGL (Light and Versatile Graphics Library): This is what creates the beautiful graphical interface.
TFT_eSPI: This library handles the low-level communication with the display.
Crucial Note: Generic library installs often won’t work. You must use the specific configuration files (lv_conf.h and User_Setup.h) provided in our dedicated setup tutorial. Using the wrong configuration will result in a blank screen or compilation errors.
Install ArduinoJson: This library will help us decode the weather data from the Open-Meteo API. Go to Sketch > Include Library > Manage Libraries, search for “ArduinoJson,” and install the version by Benoit Blanchon (we recommend version 7.0.4 for this project).
Phase 2: The Code and Customization (Your Project, Your Data)
Now for the exciting part. We’ll provide you with the complete, tested code. You just need to add your personal details.
Download the Required Files:
The Main Code: Copy the full Arduino sketch provided below.
weather_images.h: This file contains all the custom icons (sun, cloud, rain) encoded for LVGL. This is essential.
Important: Download this file and save it in the same folder as your main .ino sketch file. Your Arduino IDE should show two tabs: one for the main code and one for weather_images.h.
Copy and Personalize the Main Arduino Code:
Copy the code below into your Arduino IDE. You’ll need to modify a few key lines for your location and Wi-Fi.
/*  Rui Santos & Sara Santos - Random Nerd Tutorials - https://RandomNerdTutorials.com/esp32-cyd-lvgl-weather-station/
    Full tutorial and explanation available at the URL above.
    ... [rest of the code as provided in the original article] ...
*/
Insert Your Wi-Fi Credentials: Find these lines and replace the placeholders with your actual network name and password.
const char* ssid = "YOUR_SSID_HERE";
const char* password = "YOUR_PASSWORD_HERE";
Set Your Location: Enter the latitude and longitude for your city. You can easily find these with a quick Google search for “latitude and longitude for [your city]”.
String latitude = "41.14961";   // Example: Porto
String longitude = "-8.61099";  // Example: Porto
String location = "Porto";       // Your city name for display
String timezone = "Europe/Lisbon"; // Find your timezone from the list in the article
Choose Your Temperature Scale: By default, the code is set to Celsius. To change to Fahrenheit, simply change the #define TEMP_CELSIUS 1 line to #define TEMP_CELSIUS 0.
#define TEMP_CELSIUS 1 // Change to 0 for Fahrenheit
Phase 3: Uploading and Troubleshooting (Making It Work)
Select Your Board and Port: In the Arduino IDE, go to Tools > Board and select ESP32 Dev Module. Then, select the correct COM port under Tools > Port.
Fix the “Sketch Too Big” Error: The code and images take up a lot of space. If you get an error about the sketch being too large, you need to change the partition scheme. Go to Tools > Partition Scheme and select “Huge APP (3MB No OTA/1MB SPIFFS)” or any option with an APP size larger than 1.4MB.
Upload and Watch It Come to Life: Click the upload button. After a successful upload, the display will initialize, connect to your Wi-Fi, and within a few seconds, your very own weather station will be live!
Building your own ESP32 weather station is more than just a fun weekend project—it’s a statement. It’s a declaration that you prefer to build, customize, and understand the technology in your life. It’s a functional piece of tech you can be proud to display on your desk.
With the ESP32 CYD and LVGL, the possibilities are endless. From here, you could add weather forecasts, connect it to your home automation system, or even turn it into a digital photo frame.
Ready to get started? Grab your ESP32 CYD board today and follow this guide. We can’t wait to see what you build!
======================================
No account yet?
Create an Account