


Compatibility: Raspberry Pi 5B / 4B / 3B+ / 3B / 3A+ / 2B / 1B+ / 1A+
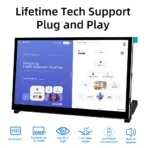
If there are display issues, simply modify the configuration file to rectify them.
Screen Specifications:
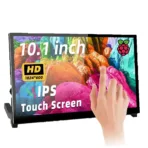
Size: 10.1 inch
Resolution: 1024*600 pixels
Screen Type: IPS
Touch Type: 5-point capacitive touch
Brightness:220 cd/m²
Interface: HDMI
Touch IC: GT9271
Active Area: 222.72*125.28 mm
Outline Size: 236.00*145.57 mm
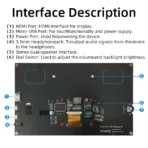
Key and Interface Function Description

-
① HDMI Interface – Input HDMI signal, using HDMI cable connection, commonly used to connect to the computer,The maximum supported resolution is 1920×1080
-
② Touch Interface – Transfer touch signal, connect with micro USB cable, provide touch and power supply function, commonly used to connect computer
-
③ Power Interface – Connect to the power supply and use micro USB cable to connect. Only power supply function is provided
-
④ 3.5mm Audio Interface – Output audio signal, connect audio output device, such as headphones
-
⑤ Stereo speakers – Output audio signal for external playback of audio signal
-
⑥ Touch Interface – Transmit touch signal, connect with micro USB cable, provide touch and power supply function, commonly used to connect Raspberry Pi
-
⑦ HDMI Interface – Input HDMI signal, connect with HDMI adapter, only used to connect to the Raspberry Pi,The maximum supported resolution is 1024×600
-
⑧ Cooling Fan Interface – Connect cooling fan
-
⑨ Copper x 8 – Used to connect raspberry pie and scaffolds
-
⑩Wheel Switch – Used to adjust screen backlight brightness and volume. By default, in the volume adjustment state, up and down to adjust the volume + and -. Press the switch to switch to the backlight brightness adjustment state, up and down to adjust the backlight brightness increase and decrease respectively. The volume and backlight brightness adjustment state is switched by pressing the switch.
Product Size


Connect to Raspberry Pi

Working with Raspberry Pi
Step 1. Download the Official image
1) Download Raspbian Official Image
Download URL: https://www.raspberrypi.org/downloads/raspbian/
Username: pi Password: raspberry
2) Download Ubuntu Mate Official Image
Download URL: https://ubuntu-mate.org/download/
The user name and password can be set by yourself after startup
3) Download Kail Official Image
Username: kali (The old version is root) Password: kali(The old version is toor)
4) Download Retropie Official Image
Download URL: https://retropie.org.uk/download/
Username: pi Password: raspberry
Step 2. Brun Official Image
1) Download and install tool software(If they are already installed,this step can be ignored)
-
SD card format software SDCard Formatter download URL :https://www.sdcard.org/downloads/formatter_4/
-
Image burning software win32diskimager download URL: https://sourceforge.net/projects/win32diskimager/
2) Format SD card
-
Insert the SD card into the card reader -> Insert the card reader into the computer -> Open the SDFormatter software -> Select SD card ->
Select quick format (generally select quick format, other options can be selected according to your own needs) -> Click the Format button ->
Select “Yes” -> Click OK after formatting.
3) Brun Image
-
Open the win32diskimager software -> Select the image file to be burned (xxx.img ) -> Select SD card -> Click the “write” button ->
Select “Yes” -> Wait for the burning to complete (the whole process lasts about 10 minutes)
Step 3. Modify the “config.txt” configuration file
-
Open the “config.txt” file in the root directory of SD card on the computer, Add the following at the end of the file, save and exit.
hdmi_force_edid_audio=1
max_usb_current=1
hdmi_force_hotplug=1
config_hdmi_boost=7
hdmi_group=2
hdmi_mode=87
hdmi_drive=2
display_rotate=0
hdmi_timings=1024 1 50 18 50 600 1 15 3 15 0 0 0 60 0 40000000 3
Step 4. Insert SD card
-
After the above steps are completed, pop up the SD card on the computer and insert it into the SD card slot on the back of the raspberry pie.
Step 5. Running system
-
Connect the HDMI interface and touch interface of the display screen to raspberry pie, connect the power supply of raspberry pie,
and start the machine to display and touch normally.
Work as HDMI touch monitor
-
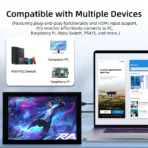
This product can be used as the HDMI touch monitor of Windows computer, only need to connect HDMI interface and TOUCH interface, can normally display and support up to five points touch.
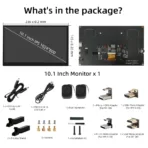
Package List
-
1 x 10.1 Inch Display
- 1 x HDMI to HDMI Cable
- 1 x Micro-USB to USB Cable
- 1 x Dual Speakers
- 1 x Micro-HDMI Adapter (For RPI 4B)
- 1 x USB-Micro Adapter (For RPI 5/4B)
- 2 x Display Stand
- 8 x Screws
- 1 x Installation kit
- 1 x Micro-HDMI Adapter (For RPI 5/3B)
- 1 x USB-Micro Adapter (For RPI 3B)
Cetifications: